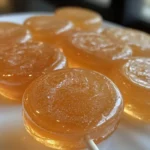
Caramel Apple Vodka Lollipops are a fun, boozy twist on a classic fall treat, perfect for parties or gifting. Ready in under 10 minutes, these sweet-and-tart delights make enjoying Caramel Apple Vodka Lollipops both easy and irresistible.
I first made this recipe after a cozy autumn family dinner, when everyone was craving something playful yet elegant. Much like my popular caramel apple sangria, these Caramel Apple Vodka Lollipops quickly became a crowd favorite—sweet memories wrapped in a grown-up candy.
Why You’ll Love Caramel Apple Vodka Lollipops
These Caramel Apple Vodka Lollipops are more than just a sweet treat—they’re a festive way to bring fall flavors and a little fun to your gatherings. The rich caramel blends perfectly with crisp apple vodka, giving each bite a balance of sweet and tangy. They’re quick to make, require just a handful of ingredients, and double as both a dessert and a party conversation starter. Whether you’re hosting friends, gifting homemade goodies, or just treating yourself, these lollipops are guaranteed to impress.
These Caramel Apple Vodka Lollipops are a fun, no-bake treat that blends caramel sweetness with crisp apple flavor and a boozy kick. Perfect for parties, gifts, or anytime you want a grown-up twist on a childhood favorite.
Prepare your workspace by gathering all ingredients and tools in a clean, organized area.
In a mixing bowl, whisk together apple juice, caramel sauce, vodka, sugar, lemon juice, cinnamon, and salt until smooth and dissolved.
Gradually whisk in the apple-flavored gelatin to prevent clumps. Mix until fully dissolved.
Carefully pour the mixture into silicone lollipop molds, filling each to the top.
Insert lollipop sticks in the center, ensuring they stand straight without touching the mold bottom.
Refrigerate for at least 4 hours, or until lollipops are fully set and firm.
Gently remove from molds by pulling on the sticks.
Serve immediately or store in an airtight container in the refrigerator for up to 1 week.
Notes
For a stronger kick, increase the vodka slightly, but be careful not to add too much or the lollipops may not set properly. For a kid-friendly version, simply omit the vodka.
Nutrition
Serving Size:1 lollipop
Calories:85
Sugar:15 g
Sodium:45 mg
Fat:1g
Saturated Fat:0g
Unsaturated Fat:0g
Trans Fat:0g
Carbohydrates:18 g
Fiber:0 g
Protein:1 g
Cholesterol:0 mg
Ingredients
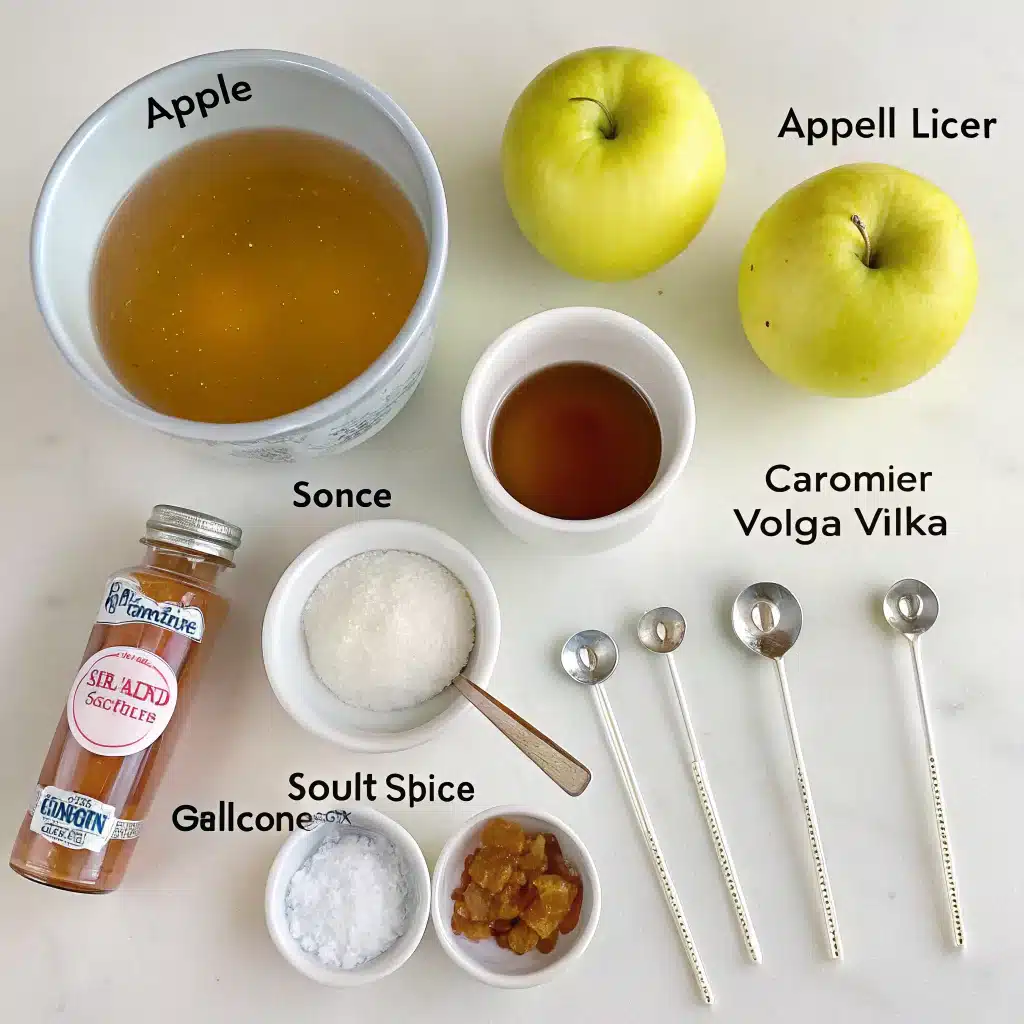
1 cup apple juice – Use 100% pure apple juice for the best flavor; avoid juice with added sugar, as the caramel and gelatin already bring sweetness.
1/2 cup caramel sauce – A thick, rich caramel sauce works best. You can use store-bought or homemade caramel for extra depth.
1/4 cup vodka – Choose a smooth vodka, or try caramel vodka or apple-flavored vodka for an extra flavor boost.
1/4 cup granulated sugar – Helps balance the tartness of the lemon juice and enhances the sweetness of the lollipop.
1 tablespoon fresh lemon juice – Freshly squeezed lemon juice brightens the flavor and prevents the lollipops from tasting too heavy.
1/2 teaspoon ground cinnamon – Adds a warm, spiced note that pairs perfectly with caramel and apple.
1/4 teaspoon salt – A pinch of salt intensifies the caramel flavor and balances the sweetness.
1 cup apple-flavored gelatin (such as Jell-O) – Provides structure and flavor. Be sure to use the powdered form for easy mixing.
Lollipop sticks – Wooden or plastic sticks that hold their shape well once chilled.
Silicone lollipop molds – Flexible molds are best for releasing the lollipops without breaking them.
Instructions
Step 1 – Prepare Your Workspace Start by setting up a clean and organized workspace. Lay out your lollipop sticks and molds so they’re ready when you pour in the mixture. Lightly spray the molds with a small amount of non-stick spray to make removal easier later.
Step 2 – Mix the Base Ingredients In a large mixing bowl, whisk together the apple juice, caramel sauce, vodka, granulated sugar, lemon juice, cinnamon, and salt. Keep whisking until the sugar fully dissolves and the mixture becomes smooth and uniform. This ensures that every lollipop has balanced flavor.
Step 3 – Add the Gelatin Gradually sprinkle the apple-flavored gelatin into the bowl while whisking continuously. This slow addition helps prevent clumping. Continue whisking until the gelatin is completely dissolved and the mixture looks glossy.
Step 4 – Pour into Molds Carefully pour the liquid mixture into your silicone lollipop molds. Use a small pitcher or measuring cup with a spout for easier pouring. Fill each cavity to the top, making sure the surface is level.
Step 5 – Insert the Sticks Place a lollipop stick in the center of each cavity. Press it gently into the mixture so it stands upright. Avoid letting the stick touch the bottom of the mold—this keeps the candy balanced once set.
Step 6 – Chill and Set Transfer the filled molds to the refrigerator. Allow the lollipops to chill for at least 4 hours, or until they are completely firm to the touch. For best results, leave them overnight.
Step 7 – Remove and Serve Once set, carefully pull the lollipops from the molds by gently tugging the sticks. If they resist, press lightly on the back of the mold to help release them. Arrange on a platter and serve immediately, or store in an airtight container in the refrigerator for up to 1 week.
If you’re looking for more fun and festive drinks to pair with your baking, I’ve got you covered! Discover the magic and add a little sparkle to your next gathering with my Fairy Dust Shots, Mermaid’s Sparkle Punch, and Halloween Margaritas recipes. Each one is colorful, playful, and guaranteed to wow your guests—just click here to explore them all!
Creative Variations – Caramel Apple Vodka Lollipops
Caramel Vodka Twist – Swap the plain vodka with caramel-flavored vodka to deepen the caramel notes and create a richer, sweeter finish.
Cinnamon-Apple Spice – Add a pinch of ground nutmeg or clove along with the cinnamon for a more autumn-inspired flavor profile.
Candy Apple Crunch – After unmolding, roll the edges of the lollipops in crushed candy or toffee bits for extra texture and a carnival-style touch.
Boozy Duo Flavor – Replace half the apple juice with pear or cranberry juice for a fun twist that balances sweet and tart flavors.
Kid-Friendly Version – Omit the vodka completely and increase the apple juice. The lollipops will still taste amazing and can be enjoyed by everyone.
Pro Tips – Caramel Apple Vodka Lollipops
Measure carefully: Too much vodka can prevent the lollipops from setting properly. Stick to the recipe ratios for best results.
Use fresh lemon juice: Bottled juice can taste flat. Freshly squeezed lemon adds brightness and helps balance the sweetness.
Avoid clumps: Sprinkle the gelatin slowly while whisking to keep the mixture smooth and glossy.
Chill thoroughly: Don’t rush the setting process—leave the molds in the fridge for at least 4 hours or overnight for perfect firmness.
Prep the molds: Lightly spray silicone molds with non-stick spray to make unmolding easier and reduce breakage.
Creative sticks: For a festive touch, use decorative lollipop sticks or even paper straws cut to size.
Storage tip: Store the lollipops in parchment paper layers inside an airtight container in the fridge to keep them fresh and prevent sticking.
Conclusion
Caramel Apple Vodka Lollipops are a playful way to enjoy the cozy flavors of fall with a grown-up twist. Sweet caramel, crisp apple, and a splash of vodka come together in a no-bake treat that’s as fun to make as it is to eat. Whether you serve them at a party, give them as homemade gifts, or simply enjoy them as a personal indulgence, these lollipops are sure to impress. With creative variations and a few simple pro tips, you can easily make this recipe your own and bring a little sweetness—and a little spirit—to every occasion.